Install a Bathroom Sink Drain three words that might sound like a task best left to a plumber, but the truth is, it’s easier than you think. In fact, with the right steps and tools, installing a bathroom sink drain is a rare DIY job that’s budget-friendly, beginner-friendly, and incredibly satisfying once done right.
I learned this firsthand when a slow drip from the bathroom cabinet in my aunt’s Toa Payoh flat turned into a full-on weekend project. What started as a minor annoyance became an opportunity to learn a new skill and avoid a costly plumbing bill. If you’re living in Singapore, especially in an HDB or condo unit where maintenance costs add up quickly, knowing how to handle basic fixes like this can be a real lifesaver.
This guide will walk you through how to install a bathroom sink drain in a clear, practical way no fluff, no confusing jargon. Let’s get started and turn your drip problem into a DIY win. LS Plumber Singapore also offers clogged drain, urinal bowl, and shower taps installation services in Singapore.
Why the Bathroom Sink Drain Deserves Your Attention
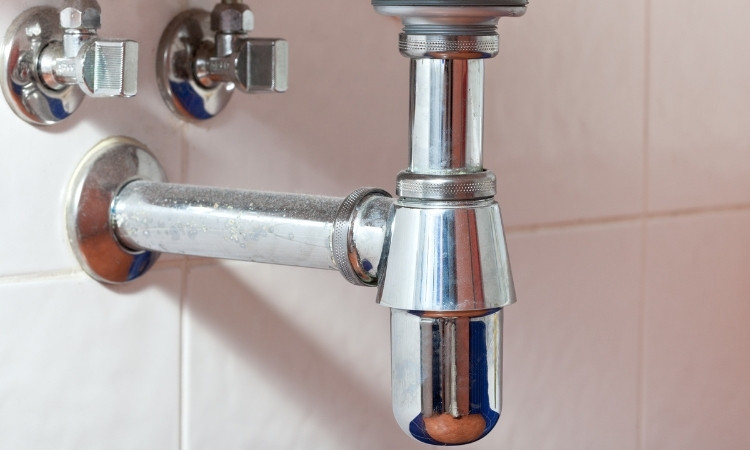
A Bathroom Sink Drain isn’t the flashiest part of your bathroom, but it’s essential to the overall function. It’s the gateway between your sink and the plumbing system. If it’s not sealed correctly or installed tightly, you’re looking at water damage, mold growth, and even warped cabinets all of which are common issues in Singapore’s humid climate.
Especially in compact HDB bathrooms or BTO flats where air circulation may be limited, a properly functioning drain is crucial. The efficient operation of bathroom drains significantly matters in small HDB bathrooms and BTO flats because of their restricted ventilation. Knowing the importance of bathroom sink drain installation benefits all homeowners who have new residences or need to maintain older properties.
Tools & Materials You’ll Need for Installing a Bathroom Sink Drain
Before you dive into the actual process, gather everything you need. Trust me it’s frustrating to have your hands under the sink only to realize you forgot the pipe tape.
Basic Tools:
- Adjustable wrench or basin wrench
- Plumber’s putty or waterproof silicone sealant
- New bathroom sink drain assembly
- Rubber gaskets and washers
- Pipe tape (Teflon tape)
- A bucket or small towel (to catch any residual water)
You can find these at local hardware shops like Self-Fix, Horme Hardware, or online platforms like Shopee and Lazada. If you’re choosing a drain kit, make sure it’s compatible with the type of sink you have some are built with overflow holes, and others are not.
Step-by-Step: How to Install a Bathroom Sink Drain in Singapore
Let’s walk through the full Bathroom Sink Drain Installation process. Whether you’re working with a ceramic sink or a modern countertop basin, the method remains quite similar.
1. Prep Your Work Area
Clear out the cabinet under the sink and lay down a towel or small bucket to catch any water left in the pipes. If this is your first time, take a picture of your current setup. It helps as a reference in case you need to reconnect something.
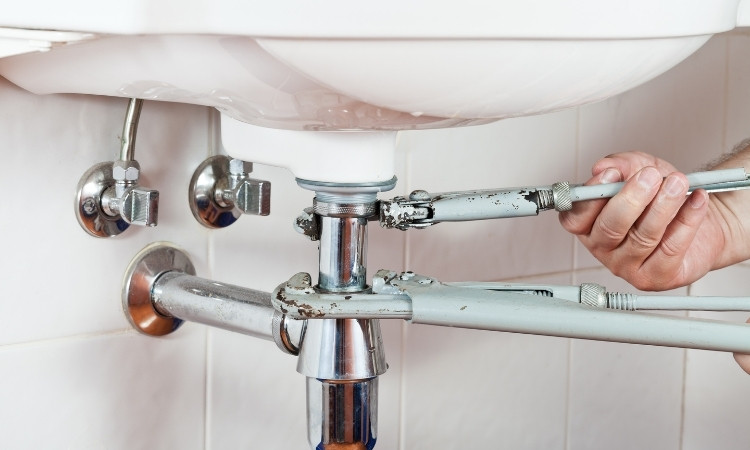
2. Remove the Old Drain Assembly
Unscrew the lock nut under the sink, holding the drain in place. Loosen the P-trap (the U-shaped pipe) and disconnect it. Pull the old drain body out of the sink. Use a cloth to clean the drain hole and remove any old plumber’s putty or grime.
3. Apply Sealant
Apply a silicone ring or roll a tiny bit of plumber’s putty underneath the new drain flange. This is what will create a watertight seal between the sink and the new drain. Silicone is often better in humid environments like Singapore.
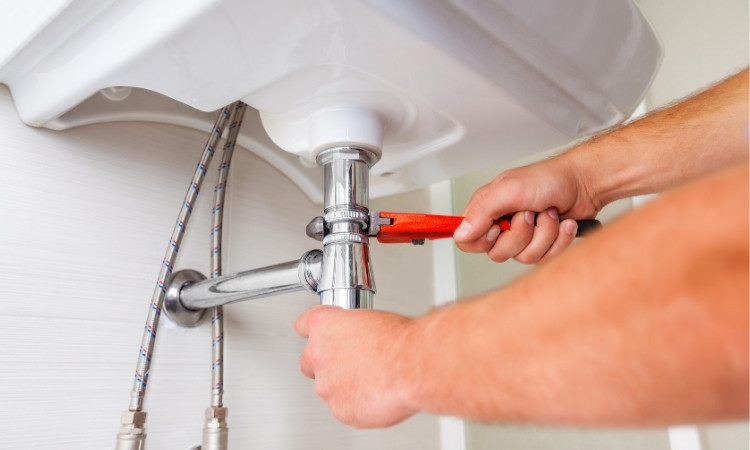
4. Insert and Secure the New Drain
Push the drain body through the sink from the top, then slide the rubber gasket and washer onto the bottom side. Thread the mounting nut and tighten it with your wrench. Don’t over-tighten it can damage ceramic sinks or strip the plastic threading.
5. Reconnect the P-Trap
Position the P-trap next to the drain’s tailpiece before securing it using slip nuts. Secure the drain in place with slip nuts. When working with outdated piping, you should apply Teflon tape over the threads to achieve both a strong and leak-proof connection.
6. Test the Drain
Turn on the tap and let the water run. Look underneath for leaks. If you spot any drips, tighten the fittings gently and wipe dry. Repeat until there’s no water escaping.
Congratulations! You’ve just completed installing a bathroom sink drain all by yourself.
Conclusion: A Small Fix That Makes a Big Difference
Mastering how to install a bathroom sink drain might not be exciting at first, but once you’ve done it, you’ll realize just how much peace of mind a simple fix can bring. No more leaks under the vanity. No more mystery puddles on the bathroom floor. And definitely no more calling a plumber for something you now know how to handle yourself.
In Singapore’s humid environment, where mold and moisture are constant concerns, a proper Bathroom Sink Drain Installation Singapore homeowners can rely on is more than just a convenience it’s a necessity. With this step-by-step guide, you’ve got the knowledge to take on the task with confidence.
You don’t need to be a seasoned handyman to take care of your space. You just need the right guidance and now, you have it. So go ahead, grab that wrench, and take the first step toward a cleaner, better bathroom. You’ve got this.